Hi everyone,
Hope you’re doing good.
A client reached up to us asking to update their Oracle Enterprise Manager and its agents from 13.5.0.9 to latest Release Update available.
First of all, we need to understand from which note we can find the latest OEM RU available. Here we go:
Enterprise Manager 13.5 Main Release Update List (Includes Plug-ins) (Doc ID 2760230.2)
From this note, we have a lot of information, I will show below the two sections I’ve got the latest RU for OEM and OEM Agent.
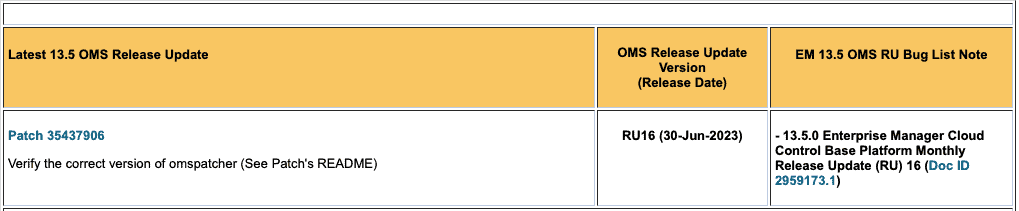
Below we have the info for latest RU for OMS (Oracle Management Service), the OEM server:
Below we have the info for latest RU for OEM Agent:

OK, so, we know that we need at least two patches:
- 35437906: RU 16 for OMS
- 35437910: RU 16 for OEM Agent
Please, keep in mind that before proceed updating OMS and OEM Agent, we also need to update the tool that we will use to perform this update. If you are a DBA, you know very well about OPatch. OK, for OEM/OEM Agent, the tools are a little bit different:
- omspatcher: to apply patches into OMS
- agentpatcher: to apply patches into OEM Agent
Great, so, we also need to update omspatcher and agentpatcher, you need to follow two notes for that:
13.5: How To Upgrade Enterprise Manager 13.5 Cloud Control OMSPatcher Utility to the Latest Version (Doc ID 2809842.1)
13.5: How to Upgrade AgentPatcher to the Latest Version (Doc ID 2810322.1)
So, to summarize, in order to update omspatcher and agentpatcher to latest versions:
Patch 19999993: OMSPatcher patch of version 13.9.5.14.0 for Enterprise Manager Cloud Control 13.5.0.0.0
Patch 33355570: AgentPatcher release of version 13.9.5.5.0 for Enterprise Manager Cloud Control Agent 13.5.0.0.0
Perfect, so, we need to download 4 files in total:
- ————————————————–
- 35437906: RU 16 for OMS
- 19999993: OMSPatcher version 13.9.5.14.0
- ————————————————–
- 35437910: RU 16 for OEM Agent
- 33355570: AgentPatcher version 13.9.5.5.0
- ————————————————–
Perfect!
Let’s proceed updating OMSPatcher.
The ORACLE_HOME for OEM is: /u04/app/oracle/product/OEM_135.
PATH environment variable is defined as: $ORACLE_HOME/bin:$ORACLE_HOME/OMSPatcher:/usr/local/bin:/bin:/usr/bin:/usr/local/sbin:/usr/sbin:
Basically we need to:
- Take a backup of current omspatcher folder;
- Unzip the patch 19999993 into $ORACLE_HOME to “install” new omspatcher;
- Test if omspatcher was updated.
With user which is the owner of OEM in OS (Linux):
cd $ORACLE_HOME
mv OMSPatcher OMSPatcher.bkp.20230908
cp /sapcd/p19999993_135000_Generic.zip .
unzip -q -o p19999993_135000_Generic.zip
omspatcher version
OMSPatcher Version: 13.9.5.14.0
OPlan Version: 12.2.0.1.16
OsysModel build: Tue Apr 28 18:16:31 PDT 2020
OMSPatcher succeeded.
OK, before we start applying the patch, it’s good to save some information about our environment, as part of this information will be used in some steps. Let’s get the status about OMS with flag details. With oraoem user:
emctl status oms -details
Oracle Enterprise Manager Cloud Control 13c Release 5
Copyright (c) 1996, 2021 Oracle Corporation. All rights reserved.
Console Server Host : OEM-01.domain.com
HTTP Console Port : 7788
HTTPS Console Port : 7802
HTTP Upload Port : 4889
HTTPS Upload Port : 4903
EM Instance Home : /u04/app/oracle/product/gc_inst2/em/EMGC_OMS1
OMS Log Directory Location : /u04/app/oracle/product/gc_inst2/em/EMGC_OMS1/sysman/log
OMS is not configured with SLB or virtual hostname
Agent Upload is locked.
OMS Console is locked.
Active CA ID: 2
Console URL: https://OEM-01.domain.com:7802/em
Upload URL: https://OEM-01.domain.com:4903/empbs/upload
WLS Domain Information
Domain Name : GCDomain
Admin Server Host : OEM-01.domain.com
Admin Server HTTPS Port: 7102
Admin Server is RUNNING
Oracle Management Server Information
Managed Server Instance Name: EMGC_OMS1
Oracle Management Server Instance Host: OEM-01.domain.com
WebTier is Up
Oracle Management Server is Up
JVMD Engine is Up
Please, pay attention on this line:
Admin Server HTTPS Port: 7102
This is the port of Weblogic Server. We’ll need this port to create a property file before we apply the patch.
Why create a property file?
During patch of OEM, you will be asked to setting Weblogic credentials. To avoid setting the credentials every time, you can create a property file, so, the patching activity will read the credentials from property file and you will not be asked to set the Weblogic credentials during patching.
First step is to create the keys, you will be asked to input the weblogic admin server username and the weblogic admin server password. For reference, usually the weblogic admin server username is weblogic.
$ORACLE_HOME/OMSPatcher/wlskeys/createkeys.sh -oh /u04/app/oracle/product/OEM_135 -location /home/oraoem
The oraclehome passed is valid.
The wls url is t3s://OEM-01.domain.com:7102
Please enter weblogic admin server username : weblogic
Please enter weblogic admin server password :
The cfgFile is /home/oraoem/config
The keyFile is /home/oraoem/key
Initializing WebLogic Scripting Tool (WLST) …
Welcome to WebLogic Server Administration Scripting Shell
Type help() for help on available commands
Wed Aug 09 13:33:38 UTC 2023
Storing WLS User configuration
Admin url: t3s://OEM-01.domain.com:7102
Admin Config File: /home/oraoem/config
Key File : /home/oraoem/key
Please enter weblogic admin server username :
Enter Admin user’s password:
Wed Aug 09 13:33:38 UTC 2023
Connecting to AdminServer
Connecting to t3s://OEM-01.domain.com:7102 with userid weblogic …
Successfully connected to Admin Server “EMGC_ADMINSERVER” that belongs to domain “GCDomain”.
Creating the key file can reduce the security of your system if it is not kept in a secured location after it is created. Creating new key…
The username and password that were used for this WebLogic Server connection are stored in /home/oraoem/config and /home/oraoem/key.
Disconnected from weblogic server: EMGC_ADMINSERVER
**** **88
0
User configuration file created: /home/oraoem/config
User key file created: /home/oraoem/key
‘createkeys’ succeeded.
From the output above, we need to get the URL to connect on Weblogic using protocol t3s, which in our case is:
t3s://OEM-01.domain.com:7102
The config and key files were created:
- /home/oraoem/config
- /home/oraoem/key
Now, let’s create the property file, under /home/oraoem, create a file named property_file with the following content:
AdminServerURL=t3s://OEM-01.domain.com:7102
AdminConfigFile=/home/oraoem/config
AdminKeyFile=/home/oraoem/key
Next step is run the analyze to check if everything is fine before we apply the patch. But before run the analyze we need to unzip the patch file:
cd /sapcd/enkitec/19c/OEM_13.5.0.16
unzip -o -q p35437906_135000_Generic.zip
Now, let’s run the analyze:
cd /sapcd/enkitec/19c/OEM_13.5.0.16/35437906
omspatcher apply -analyze -property_file /home/oraoem/property_file
You’ll be asked to enter a username a username and password for DB, use SYS username:
Enter DB user name : sys
Enter ‘sys’ password :
The output is truncated:
Prerequisites analysis summary:
——————————-
The following sub-patch(es) are applicable: oracle.sysman.top.oms:35258598,35258570,35258589,35258702,35122519,34601404
The following sub-patches are incompatible with components installed in the OMS system: 34430473,34430509,34706773,35258654,34706739,35258672,35122483,35258713,35122522
OMSPatcher succeeded.
The analyze session finished successfully, we can proceed with patching, we need to stop oms first before apply the patch:
emctl stop oms
omspatcher apply -property_file /home/oraoem/property_file
You’ll be asked to enter a username a username and password for DB, use SYS username:
Enter DB user name : sys
Enter ‘sys’ password :
The output is truncated:
Patching summary:
—————–
Binaries of the following sub-patch(es) have been applied successfully:
Featureset Sub-patches Log file
———- ———– ——–
oracle.sysman.top.oms_13.5.0.0.0 34601404,35122519,35258570,35258589,35258598,35258702 opatch2023-08-09_13-51-23PM_1.log
The following sub-patches are incompatible with components installed in the OMS system:
34430473,34430509,34706773,35258654,34706739,35258672,35122483,35258713,35122522
Deployment summary:
——————-
The following artifact(s) have been successfully deployed:
Artifacts Log file
——— ——–
SQL rcu_applypatch_original_patch_2023-08-09_14-02-34PM.log
SQL rcu_applypatch_original_patch_2023-08-09_14-06-30PM.log
SQL rcu_applypatch_original_patch_2023-08-09_14-06-55PM.log
…
…
…
MRS-CredstoreMetadata emctl_register_CredstoreMetadata_2023-08-09_14-24-25PM.log
MRS-namedQuery emctl_register_namedQuery_2023-08-09_14-24-37PM.log
Log file location: /u04/app/oracle/product/OEM_135/cfgtoollogs/omspatcher/35437906/omspatcher_2023-08-09_13-50-54PM_apply.log
OMSPatcher succeeded.
/u04/app/oracle/product/OEM_135/cfgtoollogs/omspatcher/35437906/omspatcher_2023-08-09_13-50-54PM_apply.log
Log file location: /u01/app/oracle/product/middleware/cfgtoollogs/omspatcher/34601305/omspatcher_2022-12-14_11-33-12AM_apply.log
OMSPatcher succeeded.
Patch is applied. Let’s check into OEM.
In main OEM page, click on SYSMAN / About Enterprise Manager:
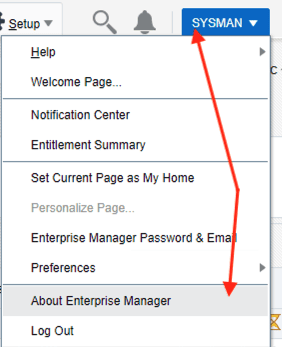
Next section will be exhibited:
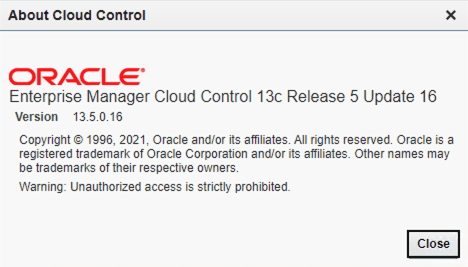
Perfect! OEM now is running on 13.5 Release Update 16
Next we need to apply the patch into OEM Agents, first step is to update AgentPatcher utility in all servers running the agent. To identify all servers that we have agents running, you can perform the following steps in OEM server. You’ll need to login as SYSMAN and then list the targets where the type are oracle_emd (agents):
emcli login -username=SYSMAN
Enter password
emcli get_targets | grep oracle_emd
1 Up oracle_emd SERVER01.domain.com
1 Up oracle_emd SERVER02.domain.com
1 Up oracle_emd SERVER03.domain.com
1 Up oracle_emd SERVER04.domain.com
1 Up oracle_emd SERVER05.domain.com
1 Up oracle_emd SERVER06.domain.com
1 Up oracle_emd SERVER07.domain.com
1 Up oracle_emd OEM-01.domain.com
1 Up oracle_emd SERVER08.domain.com
1 Up oracle_emd SERVER09.domain.com
1 Up oracle_emd SERVER10.domain.com
1 Up oracle_emd SERVER11.domain.com
1 Up oracle_emd SERVER12.domain.com
1 Up oracle_emd SERVER13.domain.com
1 Up oracle_emd SERVER14.domain.com
1 Up oracle_emd SERVER15.domain.com
1 Up oracle_emd SERVER16.domain.com
1 Up oracle_emd SERVER17.domain.com
1 Up oracle_emd SERVER18.domain.com
1 Up oracle_emd SERVER19.domain.com
1 Up oracle_emd SERVER20.domain.com
1 Up oracle_emd SERVER21.domain.com
1 Up oracle_emd SERVER22.domain.com
1 Up oracle_emd SERVER23.domain.com
1 Up oracle_emd SERVER24.domain.com
1 Up oracle_emd SERVER25.domain.com
1 Up oracle_emd SERVER26.domain.com
1 Up oracle_emd SERVER27.domain.com
1 Up oracle_emd SERVER28.domain.com
Now we have the list of servers where we have the OEM Agent running, you’ll need to perform the following steps as the user which is owner of agent running on each server:
ORACLE_HOME=$(ps -ef |grep agent_13 | grep -v grep | grep emw | awk ‘{print $8}’ | sed ‘s/\/perl\/bin\/perl//g’)
cd ${ORACLE_HOME}
$ORACLE_HOME/AgentPatcher/agentpatcher version
mv AgentPatcher AgentPatcher.bkp.20230908
cp /sapcd/enkitec/19c/p33355570_135000_Generic.zip .
unzip -q -o p33355570_135000_Generic.zip
$ORACLE_HOME/AgentPatcher/agentpatcher version
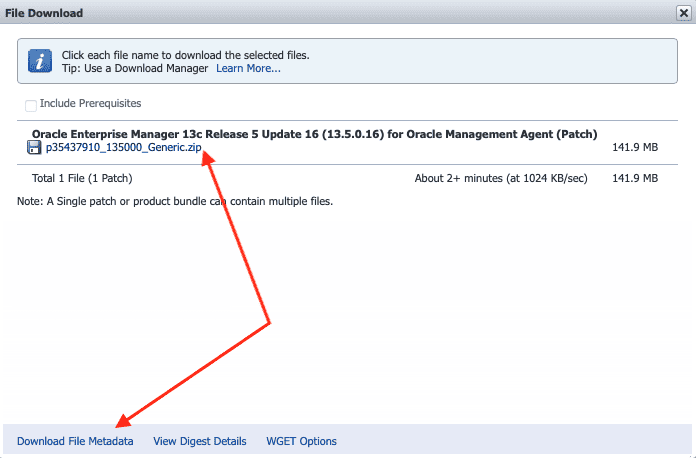
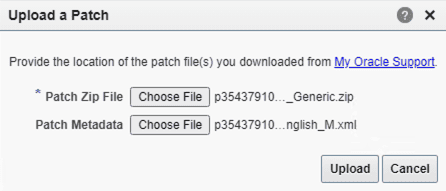
AgentPatcher is updated, next step, we need to upload the patch 35437910 (Oracle Enterprise Manager 13c Release 5 Update 16 (13.5.0.16) for Oracle Management Agent) to OEM, as this OEM environment is not connected to Internet and we need to use the Offline approach for patching. To be able to upload the patch to OEM, we need to upload two files:
- The patch file itself: p35437910_135000_Generic.zip
- The patch file metadata: p35437910_135000_American English_M.xml
You can download the patch file metadata from same window you download the patch from Metalink / My Oracle Support:
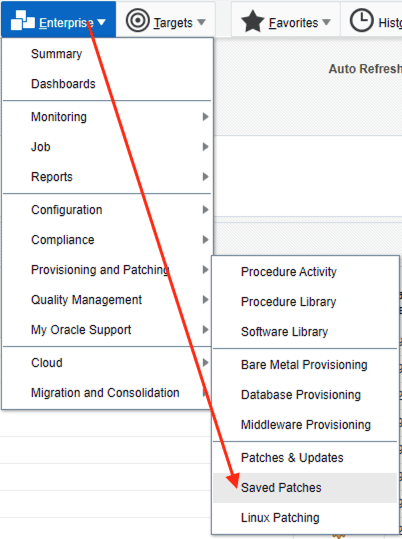
Let’s upload the patch, click on Enterprise / Provisioning and Patching / Saved Patches:
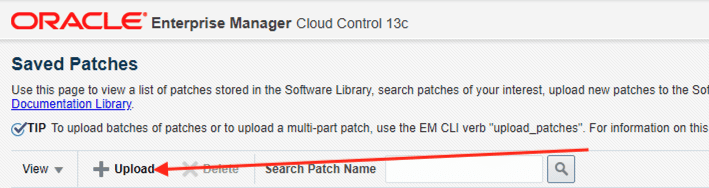
Click on Upload:
Now choose the files for patch (zip file) and the patch metadata, which were downloaded before:
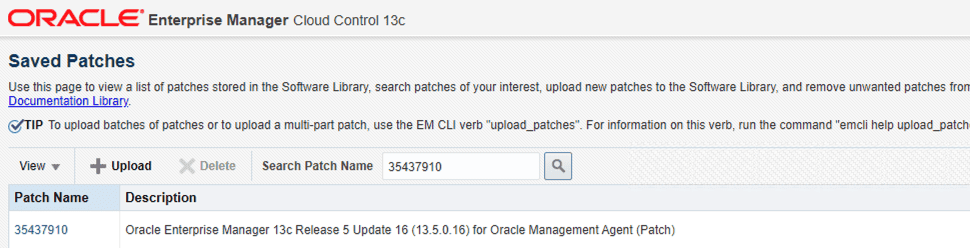
After some time, patch will be uploaded to OEM:
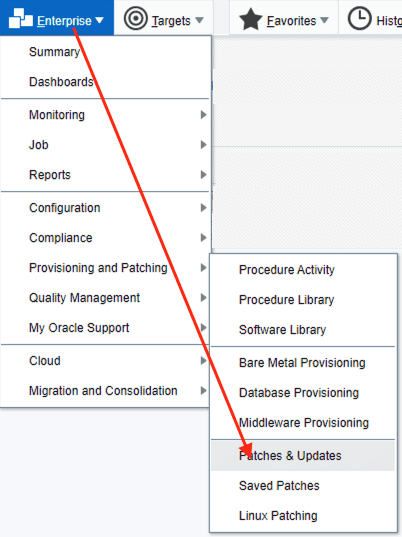
We are ready to apply the patch into Agents, for this, first click on Enterprise / Provisioning and Patching / Patches & Updates:
Unfortunately I don’t have the next screenshots, but I will put here the next steps you must perform to apply the patch into OEM Agents. I recommend you do for only one server to test the procedure, then, you can repeat all the steps below for the rest of servers:
- Search for the patch number: 35437910
- Select the patch and click on Create a Patch Plan
- Add the host(s) you want to apply the patch
- Click on Analyze, once Analyze is successful, click on Deploy
Useful notes I’ve used for this activity:
OMS:
Enterprise Manager 13.5 Main Release Update List (Includes Plug-ins) (Doc ID 2760230.2)
13.5.0 Enterprise Manager Cloud Control Base Platform Monthly Release Update (RU) 16 (Doc ID 2959173.1)
13.5: How To Upgrade Enterprise Manager 13.5 Cloud Control OMSPatcher Utility to the Latest Version (Doc ID 2809842.1)
Patch 19999993: OMSPatcher patch of version 13.9.5.14.0 for Enterprise Manager Cloud Control 13.5.0.0.0
Patch 35437906: Oracle Enterprise Manager 13c Release 5 Update 16 (13.5.0.16) for Oracle Management Service
Agent:
13.5: How to Upgrade AgentPatcher to the Latest Version (Doc ID 2810322.1)
Patch 35437910: Oracle Enterprise Manager 13c Release 5 Update 16 (13.5.0.16) for Oracle Management Agent
Patch 33355570: AgentPatcher release of version 13.9.5.5.0 for Enterprise Manager Cloud Control Agent 13.5.0.0.0
Hope this helps.
Peace!
Vinicius
PS: as a bonus, I’ll create another post with a simple Ansible playbook to update the AgentPatcher in all servers we have the agent running.
1 Comment
Leave a Reply


Very good! Congratulations!